Inspecting a roof vent is a crucial task that ensures the proper functioning and longevity of your roofing system. By examining the roof vent, you can identify any potential issues such as leaks, blockages, or damage, and take timely actions to prevent further complications. From checking for signs of wear and tear to examining the seals and flashing, this article will guide you through the essential steps of inspecting a roof vent, helping you maintain a well-ventilated and protected home.

1. Importance of Roof Vent Inspection
1.1 Ensures Proper Ventilation
One of the primary reasons why roof vent inspection is important is to ensure proper ventilation in your home or building. Roof vents play a crucial role in allowing air to circulate in the attic space, preventing the buildup of heat and moisture. Without adequate ventilation, the air inside the attic can become stagnant, leading to a variety of problems such as mold growth, roof deterioration, and increased energy consumption. By regularly inspecting your roof vents, you can ensure that they are functioning properly and effectively ventilating your home.
1.2 Prevents Moisture Damage
Roof vent inspection is also essential for preventing moisture damage to your roof and attic. When vents become damaged or deteriorated, they may allow water to enter the attic, leading to the growth of mold and mildew. Moisture can also cause the wooden components of your roof to rot, compromising the structural integrity of your home. By inspecting your roof vents regularly, you can identify any signs of damage or deterioration that may lead to moisture problems and take timely action to prevent further damage.
1.3 Enhances Energy Efficiency
Proper roof vent inspection can significantly enhance the energy efficiency of your home. When vents are functioning effectively, they allow hot air to escape from the attic, reducing the overall temperature of your home and alleviating the strain on your cooling system. This, in turn, can result in lower energy bills and increased energy savings. Regular inspections ensure that your roof vents are free from blockages or damage that could impede airflow, allowing for optimal ventilation and energy efficiency.
1.4 Increases Lifespan of Roofing Materials
By inspecting your roof vents, you can prolong the lifespan of your roofing materials. Excessive heat and moisture buildup in the attic can accelerate roof deterioration, causing shingles to crack, warp, or deteriorate more quickly. Regular inspections can help identify ventilation issues that could potentially cause damage to your roof, allowing you to address them promptly and prevent premature wear and tear on your roofing materials. This can save you money in the long run by avoiding the need for costly repairs or premature roof replacements.
1.5 Ensures Compliance with Building Codes
Lastly, regular roof vent inspections ensure that your ventilation system is in compliance with building codes and regulations. Building codes typically require adequate ventilation to prevent moisture buildup, safeguard against potential health hazards, and maintain the structural integrity of the building. By inspecting your roof vents regularly, you can ensure that your ventilation system meets these standards and avoid any potential penalties or violations.
2. Safety Precautions
2.1 Use Protective Gear
Before conducting a roof vent inspection, it is crucial to prioritize your safety by using appropriate protective gear. This includes wearing a hard hat to protect your head from falling debris, safety goggles to shield your eyes from dust and debris, and sturdy work gloves to protect your hands. Additionally, wearing non-slip footwear can help prevent accidents while working on the roof.
2.2 Inspect Under Good Weather Conditions
It is essential to conduct the roof vent inspection under good weather conditions. Avoid inspecting the vents during rain, snow, or strong winds, as these conditions can make the roof slippery and increase the risk of accidents. Choose a clear and calm day to ensure maximum safety during the inspection.
2.3 Take Precautions Against Falls
Falls from roofs can have serious consequences, so it is crucial to take precautions to prevent them. Use a sturdy ladder with a level and stable base, ensuring that it is securely placed on a flat surface. Make sure the ladder extends at least three feet above the roof edge to provide a secure handhold when transitioning onto the roof. If possible, have a spotter on the ground to assist you and ensure your safety during the inspection.
2.4 Turn Off Power Sources
Before inspecting the roof vents, it is vital to turn off any nearby power sources. This includes switches for attic fans, electrical outlets, or any other electrical devices in the vicinity. This precaution will minimize the risk of electrical shocks or accidents while working around the roof vents.
2.5 Notify Others
Informing others about your roof vent inspection is an important safety measure. Let someone else know that you will be working on the roof and provide them with an estimated timeframe for the inspection. This way, if an accident or emergency occurs, someone will be aware of your activity and able to assist or seek help if needed.

3. Exterior Inspection
3.1 Visual Examination of Vent
Start the exterior inspection by visually examining the roof vent from the ground. Look for any obvious signs of damage, such as cracks, breaks, or missing parts. Note the general condition of the vent and any visible issues that need further investigation.
3.2 Check for Damage or Deterioration
Next, climb up onto the roof and closely inspect the roof vent for any signs of damage or deterioration. This may include rust, corrosion, loose fittings, or missing screws. Pay particular attention to the seams and joints of the vent, as these areas are prone to damage and may require repairs or replacement.
3.3 Evaluate Sealant
Inspect the sealant around the roof vent to ensure it is intact and properly sealed. Look for any cracks or gaps in the sealant that could allow water to penetrate into the attic. If any issues are identified, reseal the vent using appropriate sealant or consult a professional for repairs.
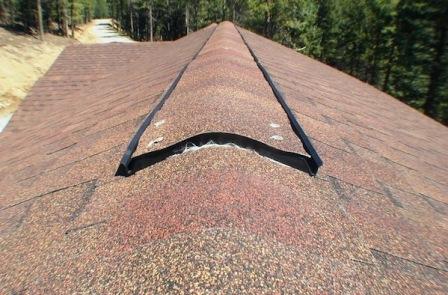
3.4 Examine Flashing
Examine the flashing around the roof vent, which is the metal material that protects the joint between the vent and the roof. Check for signs of damage, such as rust, cracks, or gaps in the flashing. Damaged flashing can lead to leaks and other issues, so it is important to address any problems promptly.
3.5 Inspect Vent Cap
Finally, inspect the vent cap, which is the component that covers the top of the roof vent. Ensure that the cap is securely attached and in good condition. Look for any signs of damage, debris accumulation, or blockages in the vent cap. Cleaning the vent cap regularly can prevent clogs and improve the overall performance of the ventilation system.
4. Interior Inspection
4.1 Enter Attic Space
To conduct the interior inspection of the roof vent, access the attic space through the designated entry point. Use a sturdy ladder and take necessary precautions to ensure safety while entering and moving around in the attic.
4.2 Check for Roof Leaks
Inspect the area around the roof vent for any signs of leaks. Look for water stains, dampness, or discoloration on the ceiling or walls near the vent. If you notice any moisture-related issues, it may indicate a problem with the roof vent or the overall ventilation system.
4.3 Inspect the Connection Point
Examine the area where the roof vent connects to the attic or ductwork. Check for any loose or disconnected parts that may impede airflow or cause leaks. Repair or reattach any components as needed to ensure a secure and efficient connection.
4.4 Evaluate Ventilation Efficiency
Assess the overall ventilation efficiency in the attic. Look for signs of excessive heat or humidity, such as condensation on the walls or insulation. Poor ventilation can lead to moisture-related problems and compromise the effectiveness of your roof vent. Consider consulting with a professional if significant issues are detected.
4.5 Assess Insulation Compatibility
Evaluate the compatibility of the insulation material with the roof vent. Improperly installed or incompatible insulation can obstruct the airflow or cause other ventilation issues. Ensure that the insulation is properly installed and does not block the ventilation pathways.

5. Assessing Airflow
5.1 Observe Air Intake and Exhaust
Observe the air intake and exhaust points of the roof vent system. Check that air is flowing freely into the attic space through intake vents, such as soffit vents or gable vents. Additionally, ensure that the exhaust vents, such as ridge vents or turbine vents, are allowing hot air to escape from the attic efficiently.
5.2 Look for Air Restrictions
Inspect the pathways for any signs of air restrictions or blockages. This can include debris accumulation, insulation obstructions, or bent/damaged components that impede the airflow. Clear any obstructions and ensure that all pathways are free from restrictions.
5.3 Measure Airflow Rate
Use an anemometer or consult a professional to measure the airflow rate in your roof vent system. This will give you an objective measurement of how well your ventilation system is performing. Compare the airflow rate to recommended guidelines to determine if further improvements or adjustments are necessary.
5.4 Evaluate Ventilation Performance
Based on the observations and measurements, evaluate the overall performance of your roof vent system. Identify any areas where improvement is needed, such as increased ventilation capacity, better airflow distribution, or enhanced insulation compatibility. Consider consulting with a ventilation expert for professional advice if significant issues are identified.
5.5 Identify Areas Requiring Improvement
Based on the assessment of airflow and ventilation performance, identify specific areas that require improvement. This may include cleaning, repairs, upgrades, or adjustments to optimize the efficiency and effectiveness of your roof vent system. Create a plan of action to address these areas and implement the necessary improvements.
6. Cleaning and Maintenance
6.1 Remove Debris from Exterior Vent
Regularly clean the exterior vent to remove any accumulated debris such as leaves, twigs, or dirt. Use a soft brush or a vacuum with a brush attachment to gently clean around the vent, ensuring that all openings are clear for proper airflow. This will prevent blockages and maintain the performance of your roof vent.
6.2 Clean Dust and Dirt from Interior Components
In the interior of the vent system, clean out any dust, dirt, or debris that may have accumulated over time. Use a vacuum with a crevice attachment or a soft brush to clean the interior components, including the ductwork, fans, or any other relevant areas. Regular cleaning will help prevent clogs and maintain optimal performance.
6.3 Remove Blockages
If you encounter any blockages or obstructions during the inspection, take immediate action to remove them. This may involve using a snake or a long, flexible brush to dislodge debris or hiring a professional to clear more severe blockages. Clearing blockages ensures that the ventilation pathways are open and unhindered.
6.4 Clear Ventilation Pathways
Inspect the ventilation pathways to ensure they are clear and unobstructed. This includes checking the ductwork, intake vents, and exhaust vents for any signs of blockages or restrictions. Clear away any obstacles that may impede the airflow, ensuring that the ventilation system can operate efficiently.
6.5 Replace Damaged Parts
If any components of the roof vent system are damaged or worn out, it is important to replace them promptly. This may include damaged ductwork, broken fans, or deteriorated vents. Consult with a professional to determine the appropriate replacement parts and ensure that the replacements are installed correctly.

7. Repair and Replacement
7.1 Patch Leaks and Seal Gaps
If any leaks or gaps are identified during the inspection, it is crucial to patch them promptly to prevent further damage. Use appropriate sealants or roofing materials to seal any cracks, holes, or gaps in the roof, vents, or flashing. Ensure that the patches are secure and provide a watertight seal to protect your home from moisture damage.
7.2 Repair or Replace Damaged Flashing
Damaged or deteriorated flashing can compromise the effectiveness of your roof vent system. If flashing issues are detected, repair or replace them as needed. This may involve removing the damaged flashing, applying new sealant, and securely installing the replacement flashing to ensure proper protection against leaks.
7.3 Replace Worn-out Vent Caps
Over time, vent caps may become worn out or damaged, impacting the performance of the ventilation system. If the vent cap is cracked, broken, or no longer functions properly, replace it with a new one. This will prevent debris from entering the vent system and maintain optimal airflow.
7.4 Address Ventilation Inefficiencies
Should the inspection reveal significant ventilation inefficiencies, it may be necessary to address the underlying issues. This might involve upgrading or expanding your ventilation system to meet the specific ventilation needs of your home. Consult with a ventilation professional to explore potential solutions and determine the most appropriate course of action.
7.5 Seek Professional Help when Necessary
If you encounter complex issues or are unsure about how to proceed with repairs or replacements, it is advisable to seek the assistance of a professional roofing contractor or ventilation specialist. They have the expertise and experience necessary to address any complications and ensure that the roof vent system is properly repaired or replaced.
8. Regular Inspection Schedule
8.1 Frequency of Inspections
To maintain the performance and efficiency of your roof vent system, it is recommended to conduct inspections on a regular basis. The frequency of inspections may vary depending on various factors, such as climate, age of the roof, and previous maintenance history. As a general guideline, consider inspecting the roof vents at least once a year, but more frequent inspections may be necessary in certain circumstances.
8.2 Seasonal Checkups
In addition to regular inspections, it is beneficial to perform seasonal checkups on your roof vent system. Inspecting the vents before extreme weather seasons, such as summer or winter, can help identify any potential issues or vulnerabilities that could worsen during these periods. Seasonal checkups provide an opportunity to ensure that the ventilation system is well-prepared for the challenges of each season.
8.3 After Severe Weather Events
After experiencing severe weather events, such as storms, strong winds, or heavy rainfall, it is important to inspect the roof vent system for any damage. Severe weather can cause roof vents to become dislodged, damaged, or compromised in other ways. Conduct a thorough inspection to identify and address any issues resulting from the weather event.
8.4 Annual Roof Maintenance
Incorporate the roof vent inspection into your annual roof maintenance routine. This allows you to assess the condition of the roof as a whole while also attending to any ventilation-specific concerns. By integrating the inspection into a comprehensive maintenance plan, you can ensure that all aspects of your roof are well-maintained and functioning optimally.
8.5 Conduct Inspections with Other Roof Maintenance Tasks
When performing other roof maintenance tasks, such as gutter cleaning, roof shingle inspection, or chimney maintenance, take the opportunity to inspect the roof vents as well. These tasks are often interconnected, and addressing them concurrently can save time and effort. Perform the necessary inspections and maintenance tasks to keep your entire roofing system in good condition.

9. Common Roof Vent Issues
9.1 Clogged or Blocked Vents
One of the most common issues with roof vents is the accumulation of debris, such as leaves, sticks, or animal nests, which can block or restrict airflow. This can lead to reduced ventilation efficiency and potential moisture-related problems. Regular cleaning and maintenance can prevent these issues and ensure proper airflow.
9.2 Leaking or Damaged Flashing
Damaged or deteriorated flashing around the roof vents can cause leaks and water intrusion. Exposure to weather elements over time can cause flashing to corrode, crack, or separate from the roof surface. Timely repairs or replacements are necessary to prevent further damage and maintain a watertight seal.
9.3 Improperly Installed Ventilation Systems
Improper installation of roof vents and ventilation systems can result in inefficient airflow and ventilation issues. This may include incorrect placement, inadequate vent capacity, or improper ductwork connections. Addressing these installation issues requires professional expertise to ensure proper configuration and maximize the performance of the ventilation system.
9.4 Inefficient Airflow
Ventilation systems can become inefficient for various reasons, including inadequate vent capacity, blocked airflow pathways, or poorly designed systems. Inefficient airflow can cause poor ventilation, temperature imbalances, and higher energy consumption. Assessing the ventilation system and making necessary adjustments can improve its overall efficiency.
9.5 Aging and Deterioration
Roof vents, like other components of your roofing system, can deteriorate over time due to exposure to weather elements. This can result in cracks, rust, corrosion, or weakened structural integrity. Regular inspections and maintenance help identify signs of aging or deterioration early, allowing for prompt repairs or replacements and extending the lifespan of the ventilation system.
10. Conclusion
10.1 Importance of Regular Roof Vent Inspections
Regular roof vent inspections are crucial for ensuring proper ventilation, preventing moisture damage, enhancing energy efficiency, increasing the lifespan of roofing materials, and ensuring compliance with building codes. By prioritizing roof vent inspections, you can catch potential issues early and take proactive measures to maintain a safe and efficient roof ventilation system.
10.2 Tips for Ensuring Roof Vent Performance
To ensure optimal roof vent performance, follow safety precautions, conduct thorough exterior and interior inspections, assess airflow, prioritize cleaning and maintenance, address any necessary repairs or replacements, and adhere to a regular inspection schedule. By following these tips and guidelines, you can help maintain the integrity and efficiency of your roof vent system.
10.3 Professional Assistance for Complex Issues
For more complex issues or if you are unsure about how to proceed with repairs or replacements, it is advisable to seek the assistance of a professional roofing contractor or ventilation specialist. Their expertise and experience will ensure that any complications are addressed properly, minimizing the risk of further damage or inefficiencies.
10.4 Maintaining a Safe and Efficient Roof Ventilation System
Regular inspections, cleaning, and maintenance are essential for maintaining a safe and efficient roof ventilation system. By incorporating these tasks into your overall roof maintenance routine, you can prevent potential issues, identify and address any problems promptly, and maximize the performance and lifespan of your roof vent system.
10.5 Preserving the Integrity of the Roofing Structure
A well-functioning roof vent system is crucial for preserving the integrity of the entire roofing structure. Proper ventilation helps regulate temperature and moisture levels, preventing damage to the roof, attic, and other components. By investing time and effort into regular inspections and maintenance, you can ensure the longevity and durability of your roofing structure.